*All prices are in US dollars and subject to change without notice
Now you can reset variables from inside the post language using :=, for example:
To increment variable #1:
? {#1:=#1+1}
To increment variable #MYVAR by twos:
? {#MYVAR:=#MYVAR+2}
To cancel #MIST:
? {#MIST:=0}
Assignment should always take place on a line by itself, except when used with a
conditional like in this last example.
If #MACHINEID=2, then turn #MIST on:
? {#MACHINEID=2}{#MIST:=1}
You can set your user variables to alphas as well as numbers. Just make your variable end with a dollar sign ($) in your source:
%#SPECIALCOMMENT$=MARY HAD A "LITTLE" LAMB
or
%#WAKEUP$=!!!DON'T FORGET TO MOVE THE CLAMP!!!
Then in the post enter something like:
? T#1 M6 (#101) (#SPECIALCOMMENT$)
This also can be used in an assignment to set your own var:
? {#SAVE4LATER$:=#SPECIALCOMMENT$}
or to add strings together:
? {#ACCUM$:=#ACCUM$#SPECIALCOMMENT$}
To help you test for empty strings, the string length is saved in the normal
(un-dollared) user variable:
? {#SPECIALCOMMENT=0}USERERROR=You forgot to enter %#SPECIALCOMMENT$
Note the $ was not used above
Here is another example of string length:
? {#MCODE=0} (NO MCODE VARIABLE IN EFFECT)
? {#MCODE}#MCODE$ (SPECIAL M CODE IS ACTIVE)
- COMP with lookahead enabled was limited to 700 elements. That limit is gone.
- %O was limited to 4 digits. That limit is gone, though you may need a slight post adjustment to take full advantage.
- You could always control the tool length offset register (usually H), using a decimal TOOL number (ie: TOOL1.21 outputs T1 H21). Now you can control the tool radius register by adding %#D in the TOOL's comment area (just after ***). For example to use D88, you would input %#D88 just before the description or your tool. You will need a slight adjustment to your post to take advantage of this new feature.
- Sequence numbers (N) were limited to just over 32,000. That limit is gone.
- For UNIM owners only:
Use section 2043 to 'lock a .P file' so that it only runs through a specific post
engine. This makes it much safer to bring a new post engine on line. Just
create a 'Fallback Post' for critical jobs or when a problem is found in a new post
engine:
2043: ? X:\Posts\MPSolid.exe
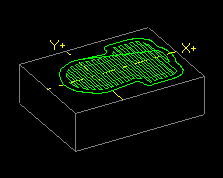
This new option takes a 2D (flat) contour or a 3D pattern and 'projects it down' upon a 3D shape (pattern) such as a plane, cylinder, sphere, cone, torus or just about any regular pattern that you can create using +VIEW.
Thus you could take a flat pocket roughing routine
and project it down upon a surface-of-translation
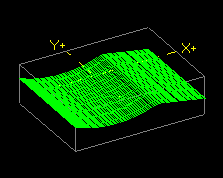
to make a pocket with an unusual floor:
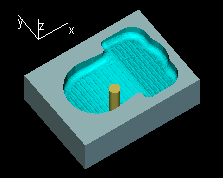
(See Pool.M for details on this part)
In source, here is how +PROJect looks:
41) +PROJ in_ out_ surf_ uponly_
When you select 41, G-ZERO asks 4 questions: (After each question, is the 'help' information)
WHAT PATTERN NUMBER WOULD YOU LIKE PROJECTED?
This routine takes a pattern and changes all the Z values so they 'ride above' another
pattern. If a point in the pattern falls off the 'edge', then the Z value is left
unchanged. DO NOT give the 'project upon' pattern yet.
**If you are confused about patterns, then see +TILT's help.
PUT RESULT INTO WHAT PATTERN NUMBER?
Enter the number of the pattern that you would like to have the projected data stored
into.
**If you are confused about patterns, then see +TILT's help.
**If the input pattern contains arcs, then they must be broken into small linear steps.
To set step distance, add it to the pattern number. ie: to set step at .05
for output pattern 3, enter 3.05
WHAT PATTERN NUMBER CONTAINS THE SURFACE?
Enter the number of the pattern that contains the shape to be projected down upon.
**Surfaces that contain large arcs and circles may produce output that is too grainy.
To set the step angle, add it to the pattern number. ie: to step every
quarter degree around pattern 3, enter 3.25
HOW SHOULD Z BE HANDLED: 1=up only, 0=full project?
Normally enter 0. Enter a 1 if you wish to have the surface 'push up through' your
data, leaving higher Z values from the input pattern alone.
**To 'warp' your input pattern (add the input pattern Z to the surface Z), just enter a Z
offset value (other than 0 or 1).
A regular pattern is one that has the same number of points for each pass of the
cutter. Project requires such a pattern for its 'Project UPON surface'. A
simple 2-View (see +View in 3DBB manual) often has 2 points on each pass of the
cutter. Project automatically breaks surface arcs using degrees rather than inches
(or mm), so that each pass is most likely to have the same number of points, no matter
what the size of the arc. 3-Views and especially 4-Views are often difficult to
project down upon because of uneven numbers of points.

Did you know you can open several G-ZERO sources at the same time? Try starting two copies of G-ZERO and then load two different source programs (or from Windows Explorer, double-click on two different sources). Then using your left-mouse button, click and drag to highlight several lines of source. Next select from the pull-down menu, Edit|Copy (or Ctrl-C). Now right click anywhere else in the OTHER source program. You will be asked whether to paste above or below the selected line of source. Special note: to cut or copy just one line of source, click and drag in a left-right direction rather than an up-down direction. If you highlight at least 30% of the source line, then it will be fully selected.
Once you have pasted some source into the clipboard using Copy (or Cut), you can paste back into the middle of the source, OR A DIFFERENT source by right clicking anywhere in the middle of your program. G-ZERO then asks whether to paste above or below the selected line.
Most people print Toolsheets by clicking on File|Print|Print ToolList, but there is another way: just enter 21) PRINT, and enter -1 instead of 1 for the FIRST LINE YOU WISH TO PRINT. This prints the Toolsheet followed by the regular source printout. Starting with version 4.3, there is a third way to produce a Toolsheet if you have a plotter or HPGL compatible laser printer -- use 19) REDRAW.
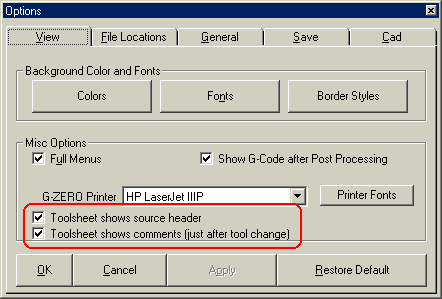
Two new checkboxes in Tools|Options|View|Misc Options allow you to add more information to your toolsheet printouts:
[ ] TOOLSHEET SHOWS SOURCE HEADER, adds the top section of your source program (all comments before first TOOL command) to the beginning of the toolsheet
[ ] TOOLSHEET SHOWS COMMENTS (JUST AFTER TOOL CHANGE), prints any comment(s) that immediately follows a TOOL command.
For owners of the G-ZERO 4-Axis Viewer option, Kurt-style vises (1 per MAT'L command) are easy to simulate. Just enter a comment immediately following your MAT'L command. This comment should start with the word VISE, followed by a space and 6 comma-delimited numbers:
MAT'L xmin0 xmax...
VISE -.375,.375,-3.5,.5,-.75,-2
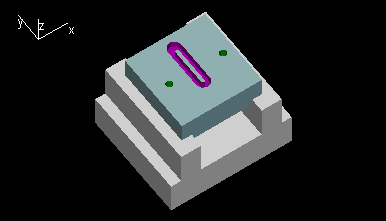
Syntax: (DESCRIBE ONE VISE JAW ONLY, NOT WHOLE VISE)
VISE xmin,xmax,ymin,ymax,zmin,zmax
For owners of the G-ZERO 4-Axis Viewer option, rectangular clamps (any number) are easy to simulate. Just enter a comment immediately following your MAT'L command. This comment should start with the word CLAMP, followed by a space and 6 comma-delimited numbers:
MAT'L xmin0 xmax...
CLAMP -1.25,.25,-1.75,-1.25,0,.375
BOLT -.5,-1.5,.375,.125,.625
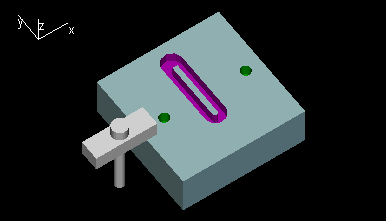
Syntax:
CLAMP xmin,xmax,ymin,ymax,zmin,zmax
For owners of the G-ZERO 4-Axis Viewer option, bolts, cap screws and stops (any number) are easy to simulate. Just enter a comment immediately following your MAT'L command. This comment should start with the word BOLT, followed by a space and 5 comma-delimited numbers:
MAT'L xmin0 xmax...
BOLT -.5,-1.5,.375,.125,.625
CLAMP -1.25,.25,-1.75,-1.25,0,.375
Syntax: (DESCRIBE ONLY THE CAP OF THE BOLT)
BOLT x,y,dia,zmin,zmax